Showing posts with label creatively crafty. Show all posts

Wednesday, 22 December 2010

Deck the halls

Thanks to journalist Niall Toner from the Irish Times for including me (along with Mel over at design heavenin his recent feature on decorating your home for Christmas on a budget. Once again, I'm great at being 'all talk' and have only just got our house blinged up for Christmas this week. I'm totally relishing being at home for the holidays with the fire blazing, the sweet smell of Christmas baking, festive tunes beating out, and fairy lights dazzling. Wishing you a happy Christmas!

Here are my decorating tips from the Times feature:

- Thread some festive ribbon through cute christmas cookie cutters and hang them from kitchen door knobs or hooks.

- Why stop with eating at the table? Edible decorations can be nibbled on anywhere in the house...adorn your nest with fresh cranberry chains, fruit & nut garlands and cheeky gingerbread men.

- Get down and dirty with the kids and have fun making, baking and painting your own bespoke decorations with salt dough. Store them carefully for use next Christmas too.

- Always have a pan of warm mulled wine on the go! The intoxicating smell of spices will waft festive cheer around the house before you even drink it.

- Stock up on festive essential oils like frankincence, orange, cinnamon, pine, clove and juniper to burn around the house (individually or in interesting combinations). Also, use a few drops in homemade cleaning products and air freshners to keep you in the festive mood as you clean.

- Bring childhood memories flooding back and have fun with potato printing your own homemade christmas cards and wrapping paper.

- The best way to instantly fill your home with Christmas cheer is to stick some of your favourite festive tunes on (mine are from Ella Fitzgerald and Frank Sinatra) and get baking Christmas goodies while you sing along.

Tuesday, 16 November 2010

Pom Pom Pretty

As always I'm oozing with Pom Pom love! This time Pom Factor has hit a lampshade once again. I bought these shades really cheaply from Ikea last year to tide us over until I found 'the one' for our hallway. Sadly, like most things I dream of, my exact specification (deep cerise, wide but shallowish drum, with diffuser base) doesn't seem to exist. So I pulled out my vast array of Pom Pom trims and teamed the shades up with these delicious double delights....

Before & After

Thursday, 29 April 2010

delicious desserts & old lady lace


the 'before' shot

Here's a little kitchen wall unit we've been working on. We bought it on ebay. It fits perfectly on a wall between two doorways. Mart painted it and put it up while I was away with work in February. It sat empty since then though as I couldn't decide what to keep on it. So I finally gave my pretty dessert glasses pride of place there recently. A sort of shrine to dessert glasses. A reminder to make delicious desserts for pretty glasses whenever possible.  I screwed some cup hooks into the bottom to hang measure spoons and aprons. All partners in the quest for delicious desserts of course.


It couldn't go with out some old ladyifying too and so I picked up a delicate lace trim on a recent haberdashery hunt and glue gunned it on. I think it was all the final straw for poor Martin who looked on in shock asking is there anything in the house for boys?! Sorry Mart. Just remember how good that knickerbocker glory is going to taste though!


Monday, 19 April 2010

Homemade Lemon Curd


If your lemon face has come back to normal from the recent lemon granita, then pucker up in anticipation of my delicious lemon curd. I keep ending up with loads of lemons left over from work and I knew that this weekend something had to be done about them before they took over completely. 

As if I needed any more encouragement with using them up, my work buddies over at Pacific TV in London, having just started tweeting, have thrown down the gauntlet in their first foodie fix..."Make us something yummy with lemons and send us pictures of the result". Loving (winning) a challenge, I went with my top favourite lemony treat. So here you go guys....I even sewed the name tag for extra points.....so what's my prize?!

LEMON CURD

Ok, so lemon curd isn't top of the list for the bikini diet (which is obviously why it's so darn good) but it's not like you eat a whole lot of it at once. Right?! I'm dreaming of it sandwiched in a cream sponge, lathered on a corner of crusty bread, marbled through mascarpone for a cheats cheesecake or straight from the spoon even! Mart just wants it on a knickerbockerglory. Try swapping the lemons for oranges for an equally delicious curd.


Makes 1L

Zest & juice of 4 lemons
400g caster sugar
150g unsalted butter, diced
8 eggs, beaten

Pour the lemon juice into a bowl set over a pan of simmering water and add the zest, sugar and butter. Stir until the sugar dissolves and butter melts.

Remove from the heat and whisk the eggs in quickly (you don’t want them to scramble).

Sit the bowl back on the pan and cook for 10-15 minutes, stirring constantly, until the curd is thick enough to coat the back of the spoon.

Pour into sterilised jars and leave to cool before covering. Keep refrigerated for up to 3 weeks.


Saturday, 17 April 2010

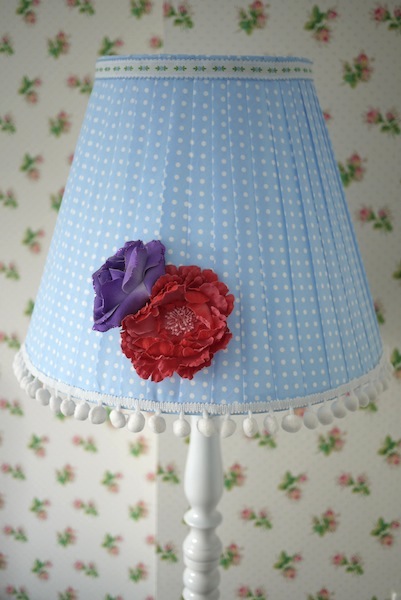
No-Sew Lampshade


This is Lolla....She's a lamp with a bit of a history. She was found deserted and lonely in Oxfam Home. She was a cheap old thing really and feeling a bit worthless with a meagre price tag of €18. She's actually a bit of an old bird but you'd never know it since going under the knife with her extreme makeover...Here's her before shot...


I know....hard to imagine this was her in a past life.


Her transformation really was a no-sew operation. The first step was stripping her bare. I then simply ironed interfacing onto the back of my chosen spotty fabric. This helps to stop the edges from fraying and stiffens the fabric a little too. I cut the fabric into 3 centimetre wide strips which were a few centimetres longer than the height of the shade frame. With my trusty glue gun, I glued the bottom of one strip to the bottom of the frame, stretched it up tightly and glued it to the top also. I overlapped the layers as I went as the top of the shade was smaller than the bottom. The glue sets really quickly so this was really quick and easy to do.


I spray painted the stand in white....my favourite refresher colour. And ta da....the first stage is done. She looked so pretty already...I love the way the fabric strips look like a pretty pleated skirt....but I wasn't finished yet...


I still haven't told you about my recent shopping escapades in New York....I'll come back to that....but I got to use some of my finds here already. Some painfully pretty ribbon and my all time favourite trim...pom poms!! Again, no sew...glue gunned on....easy peasy.


Death by Pom-Poms? Yes Please! Pom-Poms make me soooooo happy!


And then a final flourish....these are Lolla's customising accessories. The corsages are simply pinned on so she can change them whenever the mood fancies her.

Monday, 29 March 2010

Spot the Zebra

Before & After

I picked up this chest of drawers in Oxfam home for €50 (was I robbed?!). The one on the left thanks, very funny! What I was really after was a beautiful dressing table. I found lots, but realised they just didn't have enough storage...something I needed more than the glamour of sitting there pretending I was a movie star. Anyhow, I went with my usual Gok Wan clashing and chose black and white zebra stripes for the green flowery wallpaper bedroom. I have those black & white cushions in there already so hopefully you agree it works?!


I painted the whole chest white egg shell first of all. Several coats. And more again. Once dry, I then painstakingly worked out the spaces evenly and masking taped to create the stripes where the black paint would go. Also, I forgot to mention that there was a crack in the top so I figured that if I planted that right on the edge of a black stripe it would be sufficiently hidden. I do know how to make life hard for myself don't you think? Hmmm.


Then I found these cute vintage drawer knobs at the Newmarket Brocante for €15. There was a set of ten (which I needed) although they didn't match. But all the better and they came as a family so I love them. I found the mirror in Gibson Bailey salvage yard. I've kept the yard afloat during the recession so your man gave it to me for free. Thanks Sean! It has a lovely art deco detail at the top which I of course slapped a bit of (purple) paint on. Me and paint eh? It's one of those bevelled mirrors with hangy chain thingys (another obsession I must reveal to you another time). I preferred to leave it sitting on top of the chest though instead of hanging it above. And, ta da...I can be a movie star after all!

Now, as always a woman's work is never done. So i have more plans for this baby. What on earth has she got planned for this already riske chest now I hear you cry? I'll be back. It might be a while!

Wednesday, 17 February 2010

The life of a Science Lab Stool

Summer is a great time to hit auction houses as 'closed for the holidays' schools have a revamp, chucking out old chairs and desks and other such gorgeous delights for magpies like me to swallow up and reinvent. Last summer I bagged these cutesy stools at a snatch of €10 for the four. They were in an auction in a lot of nineteen and so I didn't bid (I'm not that much of a hardcore hoarder!). Although, when I came back to the auction to pick up some other 'one mans junk, another man's treasure', I asked out of interest who bought them, only to end up meeting the woman who did - she really didn't want them all either and so sold me four. I slung them in our loft (I dare not look up there at what else I have buried away!) until I had time to lovingly attend to them recently, only to find that two were one height and two were another!!! What a shame....they had been stacked and so in my bargain hunters delight I hadn't even noticed! Oh well, it was obviously meant to be that baby bears stayed with Mummy & Daddy!

Anyhow....here are some snaps of the original babies, graffiti and all. Now they have hot pink (spray painted) legs and white washed tops (with graffiti undersides as a reminder of their past life!). They now live happily tucked under our new kitchen counter (which has our cooker nestled in....more about that later).


Tuesday, 12 January 2010

sleeping beauty

Our King & Queen of France bed (as I like to call it!) has finally had it's makeover. We bought this bed on a whim on ebay a couple of years ago and it sailed it's way to Ireland from France (not very easily I might add, but that's another story!). I thought the wood part was off white but when I saw it for real I realised it was a very rich creamy colour. So, it just had to go. Well, not that easily, as first of all we had to get through the guilt of slapping crown white eggshell on top of 70 year old french crackle paint, yikes! Anyhow, we got over it and just did it and are so pleased with the result. No regrets, phew! No doubt some people will quake in their beds at the thought, but she's ours for life and we have to sleep in it. And what a sleeping beauty she is...

painstakingly applying masking tape as close to the edge of the fabric as possible and cleaning any dust and dirt from between the grooves of the wood.

we protected the velvet fabric with lots of pages torn from magazines (it actually looks quite funky like this don't you think?!)

we used a fine artists brush for hard to get to areas. yay, peeling the masking tape away, job done!

And here she is....

P.S. The wall paper is by Cath Kidston. It makes me die every time I see it, I love it & had to fight hard against Mart's 'Transformers' option! Thankfully the old lady one won!

P.P.S. By the way, we didn't brave doing any of our wallpapering ourselves but have the number of the fantastic guy who did - we would definitely highly recommend him as he did an amazing job so let me know if you need the contact.


Friday, 31 July 2009

school chairs revamp

We bought these school chairs here and recently decided to freshen them up with a lick of white paint. Here's the before and after shots along with some shots I took as I went and then a finished chair in our spare bedroom.


Thursday, 16 July 2009

elderflower cordial gift

There isn't much of our homemade elderflower cordial left so I quickly made up a small bottle of it for our neighbour, Mrs. Kelly. She was bemused to see me dangling from the tree and wondered what I was up to. She's very sweet and I can't wait to make cakes for her too once our kitchen is sorted (yawn).

I filled the cordial into a (ballygowan) water bottle which I had steralised and dried. Then I used my pinking shears (from any good haberdashery) to cut a small circle of fabric (which I got in trimmings) and secured it on top of the bottle with a piece of ribbon (from rubenesque). I then used my alphabet stamps (from ebay) and ink (easons) to stamp out the label (sticker labels from easons too). I finished off the bottom edge with my pretty lacey stamper (from martha stewart) and stuck it on.

Tuesday, 7 July 2009

homemade napkins

It's pretty quick and easy to run up some napkins, never mind how much cheaper it is than buying them and also the fact that you can make them to your own style and colour scheme. Choose a heavyish cotton or a linen - it's wise to test a little in the washing machine for shrinkage or colour loss. Cut out about 30cm squares and embellish them if you like. I simply machine sewed on some ribbons and ric rac but you could applique, embroider or print a design on either for example.


Next you need to hem it to hide the frayed fabric (and ribbon if using) edges. This is pretty easy with only the corners being a bit tricky. Working with right side down throughout, firstly, snip off a little of each corner (this helps to reduce the bulk when all the edges are folded in). The iron is your friend from here on. Iron the edges in evenly all the way round (I turned the edges about 5mm).

Iron the trimmed corners in by the same depth also. If you are not very confident at machine sewing, then tack (large hand stitches) the hem down to stay in place.

Turn the edges once more (just a little deeper than the last turn, so I went about 7mm). Pay extra attention to the all important corners so they sit together nice and neatly (or as neatly as possible at least!) - you have just made a mitred corner! Again, tack the edges down to secure in place for machine sewing.

Almost there now! Machine sew the hem in place, turning the fabric around at the corners (leaving the needle in the fabric as you do this). Remove any tacking and give a good overall press with the iron.

Fold the napkins neatly and voila and you're done!

Saturday, 27 June 2009

Homemade Bunting

I've been in my element all week busy-beeing with my homemade bunting. I'm not quite finished but thought I'd share the process so far with you.


I firstly pulled out some of my fun summery fabrics
and chose which ones I was going to use.


I made a bunting triangle pattern from a piece of A4 paper which I firstly folded in half lengthways. Then i measured down the centre fold to about 23cm and made a mark here. Finally I drew a line with a ruler from this marked point up to the opposite top hand corner and then cut along this line to give a triangle once opened out.

Then to cut the triangles out I pinned the paper pattern on each piece of fabric making sure the pattern was going in the direction I wanted it to (you can see this through the paper). Mostly I made most economical use of the fabric though when cutting out. The pic above is of some old pj's which have had their day. If you feel confident you can double the fabric over to speed things up. Use a good fabric scissors and obviously work out how many triangles you will need, allowing two triangles per piece of bunting (for back and front).


This is where I had got to with embellishing
my fabrics as described in this post.


To embellish them further I sewed some beads and sequins on some of the pieces. I thought the sparkles would be twinkle nicely on a sunny day in the garden.


I also did some hand embroidery using a metallic embroidery thread (which I split to make a little thinner). I used a variation of the blanket stitch to highlight Martins initial. Obviously this needs a good iron now before I go any further.


Then I had a go at free stitching some flowers on my initial. Don't think I did too badly. Again I went for bling and used a metallic pink thread.


Anyhow, once all the really fun creative bit is taken care of it's time to start sewing up the bunting. For good strong bunting I like to strengthen any flimsy fabrics like the very light cotton here. I cut out a triangle of interfacing (from any good haberdashery) by pinning the fabric triangle on top and then with the bumpy side against the wrong side of the fabric gave it a quick iron to stick. If you don't feel confident doing this then throw a pillow slip or other piece of fabric over it to help protect your bunting piece.


Now that all pieces are ready, decide which pieces you want to go with which - you will need a front and back. It doesn't matter too much as obviously you will only see one side or the other when hanging but it's still a consideration so you have a good mix of colours and patterns in the finished bunting. Place right sides of each pair together and pin them together down the two side to the point but not across the top (you can tack them with needle and thread first if you dont feel confident to get straight on the machine with the pins in).

Machine sew them together along this line, removing the pins as you go (again leaving the top open). Trim any excess threads (I like to go back and forth with the machine at the beginning and end to secure rather than go back over by hand).


Carefully trim the pointy end off straight across near to the stitching and then trim from here about 1-2cm up each side also. This helps with achieving a nice pointy tip (and is more important to do the thicker the fabric). Then simply turn the triangles inside out and use the point of a small scissors to gently push the thinner end of the fabric through to give a nice tip.


Next, iron the triangular pieces to neaten them up. I like to iron the seams down first to help give nice crisp edges. Then, lay out flat and iron again on both sides to give a nice firm bunting piece. Be careful of any pieces with sequins or beading as they may melt - protect them with a layer of fabric over or use a very cool iron. Nearly there now (once you have repeated with all pieces)!


You could also add another touch to your bunting with dangling ribbons. This will have to be done as part of sewing up the triangles. Simply lay your choice of ribbons down the length of the right side of one piece of fabric, tacking them down at the point end. You can also tack or pin the ribbons down half way (which will help prevent them moving around and potentially getting caught up when machine sewing). Lay the second piece of fabric right side down and continue as normal (removing the centre pin or tacks once turned out).


The machine stitching will obviously sew the ribbons in place at the point end so when you turn the piece inside out the ribbons will perfectly hang out of the end as shown (and are also handy to pull the fabric through when gently tugged). I added some beads (which I took from an old bikini before throwing it out) to one of the ribbon ends. The flower was already on the end of the pink ribbon but you could sew a small flower on yourself.

Anyhow, Voila...here's a small stack of some of my pieces (I think I have about 21 in total). I now just need to order some gorgeous gingham bias binding I have spotted on the net and then I can have great satisfaction in whizzing them all up together and hanging them in the garden! Will give you and update once I get to that stage.

Œ